
Image from en.wikimedia.org
The unique operating characteristics of the hub are detailed on Sheldon Brown's website, linked above. It has been suggested that one first disassembles the more common AW hub to get the hang of internal gear hubs but in my experience, aside from the one precaution (pawl orientation) that I will elaborate upon, overhauling the SW hub is no more difficult or complicated than rebuilding an AW. The 1958 SW hub on my Raleigh Sports was actually the very first hub I disassembled.

Here, we have a SW hub dated January, 1958. It was a complete, for-parts hub sent to me to get my Raleigh running again and contains parts swapped out such as the clutch, pawls, and planet gears.


Disassembly begins in a similar fashion as the AW hub: remove the left side lock nut and bearing cone. Next, it may be useful to mark the location of the ball ring relative to the hub shell so it can be tightened back to the same position. I never have and haven't had any problems with bearing pre-load changing. Whichever way you choose, unscrew the (regular, right-hand threaded) ball ring with a hammer and flat punch, or if you're lucky enough to have one, a Sturmey-Archer pin spanner. Loosen, but do not remove it all the way. Take care not to chip or round off the edges of the notches you hammer against. If the hub is out of the wheel as it is here, I find it easier to brace it with my foot as I attempt to rotate the ball ring. If the hub is in a wheel, this step will be much easier. As with any hub, keep rotating it, taking turns tapping on the other notches in the ball ring to spread out force and keep things round.


As stated above, the ball ring should now be loose enough to turn by hand, but not yet detached. Put the entire hub into a vise, right-side-down. This is the slightly more tricky part, so proceed with caution. If your hub is working well already and not giving the telltale skipping problem, take special care when unscrewing and removing the shell to keep the pawls from falling out. Because of the design of the hub, a well-traveled SW will likely have small dents in the pawls, seating them into their own individual notches in the pawl ring. In some cases like my own, the pawls will be smashed-in just right so that inconsistencies in machining (which was the reason why these hubs were initially unreliable) are ironed out. Reckless removal of pawls will likely result in their being placed into a different slot, allowing the inconsistencies and skipping problems to return.
Anyway, carefully unscrew the ball ring from below, keeping the hub shell still. Any stray bump may knock the pawls out at this point. Remove the hub shell slowly, directly vertically from the internals so as to not dislodge the pawls. This will be more difficult if the hub is still in the wheel. If the hub is full of oil or gunk, this step may be a bit easier. If you would like, it is possible to identify the pawls and slots with a marker to ensure proper re-installation later.


You will notice that I have utterly disregarded pawl orientation on this hub since the pawls here are not original to the hub. However, do take note of the dents on the pawls, most of which do not travel the entire height of the pawl. If you do manage to mess up the pawls and cannot be sure to get them back in the same orientation, flip them around to give a fresh surface against which the hub is driven. After a series of hard rides, the pawls may be re-dented (that is, if you don't ride too hard and shatter them). This is not something that would usually be suggested, but it works for the most part.


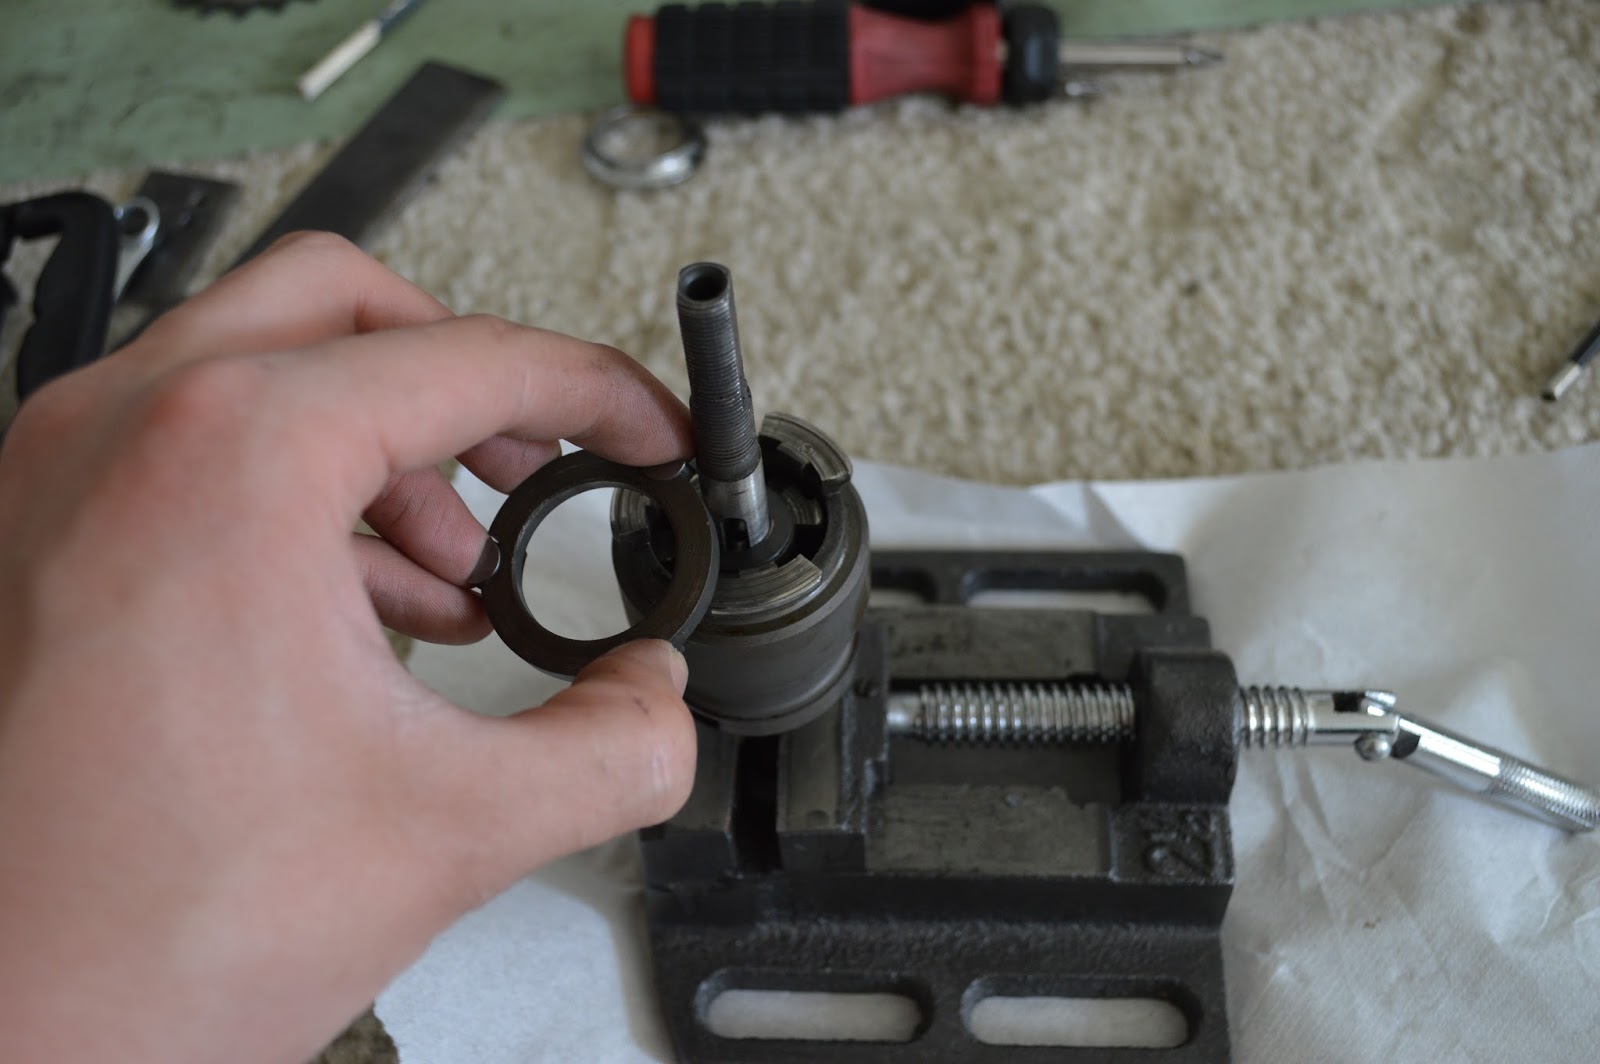
Moving on, flip the hub assembly over on the vise and remove the lock nut and bearing cone just as you would on any other hub. The driver will follow the cone upward because of spring tension.


The SW hub, unlike the AW, has a large spring wrapped around the driver to keep the "pawl retaining ring" pressed down. The purpose of this spring is outlined in the "Clutching" section in Hayes' article. Once again, be careful while working around these pawls and be sure to take note of their location and orientation. If the hub is oily and sticky, take care not to fling the pawls every which way when you un-stick the ball ring and pawl retaining ring.


After the pawl ring is removed, you can remove the three-tabbed-I-don't-even-remember-what-this-is-called (ring gear, probably) to expose the planet gears. The gears do not have removable axles like the AW and the planet carrier has a very different design. In the SW, there are much fewer sprung, reciprocating, spinning parts, but there are more "retaining rings" that are concentric to the axle. Inspect the clutch for chips. Like the AW, if the hub was ridden out of adjustment, the clutch was likely to slip off the contact points under load. Also, in the photo on the right, you can see the chipped planet gear from my old Raleigh that prompted me to swap out all three gears lest they be worn unevenly. I am not sure what caused this, as there is nothing that slides against these gears. It could have just been a sub-par component from the factory that broke under load.


There were a few design changes between early and later SW hubs, one of them being threaded and non-threaded axle keys made for one-piece and two-piece indicator rods, respectively. The other notable difference is that this earlier model has a press-fit clamping the planet carrier to the axle, while the later November one on my Raleigh had a lock nut and spacer, once removed allowing the planet cage to be taken off the left side of the axle.

With the hub completely apart, there are many minor or major modifications one can do to make the hub run better, as written by Hayes. It should be mentioned that measuring the pawls with a digital caliper may help in finding sets of similar size, but given that these hubs are nearly 60 years old and have had varying amounts of wear, this method may not prove to be effective 100% of the time.
Assembly is straightforward: it is exactly the reverse of disassembly in this case. If you intend to run the hub, I would suggest dipping each part into a cup of SAE-20, 3-in-1 blue label, ATF, or any equivalent oil to ensure proper pawl operation off the bat. Thicker oils may cause the pawls to stick, especially in cold weather. Anything too thin may just run straight out of the hub. The parts should be covered but do not have to be a drippy, sloppy mess. All extra oil will leak out of the hub after assembly. I will warn, as others have, never to use 3-in-1 oil that comes in a black label bottle.

Slide everything back onto the axle in the order it came off. If something does not fit together, then that's not how it goes. The pawl ring will not center itself on the ring gear until after the ball ring is added. Mind the pawl orientation if this matters for your hub. To re-pack the bearings, which I did not do here, I tend to prefer using a thinner grease on the ball ring bearings, such as Park Tool Polylube, to lower the resistance in 1st and 3rd gear. For the bearings inside the driver, I use standard drum brake or bearing grease.


Carefully lower the hub shell onto the assembly. If the hub shell is still laced in a wheel and the internals are stuck together with new oil, it may be easier to hold the wheel in one hand and the internals in the other and ease the assembly in from underneath. As with any internal hub, you will have to carefully rotate them back and forth to get the pawls into the left side ball ring (a.k.a. ratchet). Re-pack the left side bearings and tighten the cone so that there is zero play, then loosen roughly 1/4 turn. Re-install any necessary spacers and the lock nut. With proper bearing pre-load, you should be able hear and feel a minuscule amount of play when you grab and shake the axle, but it should hardly be visible. This may take a few tries if you don't have a Sturmey-Archer cone spanner (or a ground-down 16 mm). Be aware that old-school Sturmey-Archer hubs are not precision instruments, so do not be alarmed at the idea of "play" if newer hubs are more your thing. When the wheel is installed and axle nuts tightened, proper bearing tension will have been achieved if the wheel has between 0 and 1/16 inches of side-to-side play between the brake pads. The SW is a little more picky about pre-load than the AW so less is better, but it is still best not to over-tighten.

If the hub is now on a bike, go out and ride the heck out of it. Check if any previous skipping problems have disappeared or worsened. If you do not plan to ride it right away, place the hub or the bike over a patch of cardboard so any extra oil does not leak out and ruin your floor. Perhaps a rag should be placed between spokes on the wheel to prevent oil from fouling the tire.
As Hayes wrote on Sheldon Brown's site, proper operation of the hub is a balance between riding too hard and riding too softly. A hard knock to the pedals will get all of the pawls engaged, but soft engagement will ensure that no one pawl is overloaded. On my own bike, I don't quite slam the pedals down, but a more-firm engagement has resulted in zero skippage in any gear thus far. Being a rider of average or below-average weight, pawl breakage has not been an issue over the few thousand harsh miles I have ridden this hub.
EDIT 12-27-16: Some concern had been expressed about whether the hub is definitely completely silent, or whether a faint, ticking, freewheeling noise should be audible during normal operation. The hub was marketed to be completely silent, but since there is still mechanical contact between the ratchet rings and the pawls, some noise may be audible depending on how dry the hub is, how close your ear is to the hub when it is spinning, and how worn the pawls are. The noise is usually not very audible during regular riding but I have been able to hear the pawls when riding through very echoey tunnels. Also, since my hub has many thousands of miles on it, the noise is probably louder due to the edges of the pawls being worn slightly flatter, making it so there is more room for the wheel to spin before the ratchet ring bops them into position as opposed to them being in contact most of the time, silently moving back and forth.
No comments:
Post a Comment