Note: Sheldon Brown and John Allen have already written an excellent article on dealing with cotter pins and they do a better job explaining, so look at that first. As with the article on SW hub service, this one is meant to be a one-stop guide that hopefully supplies enough information to bring someone from start to finish on a compete rebuild of the bottom bracket, covering more than just pin removal.

Some tools that will be needed every time, so not including emergency situations in which the cotters are tremendously stuck:

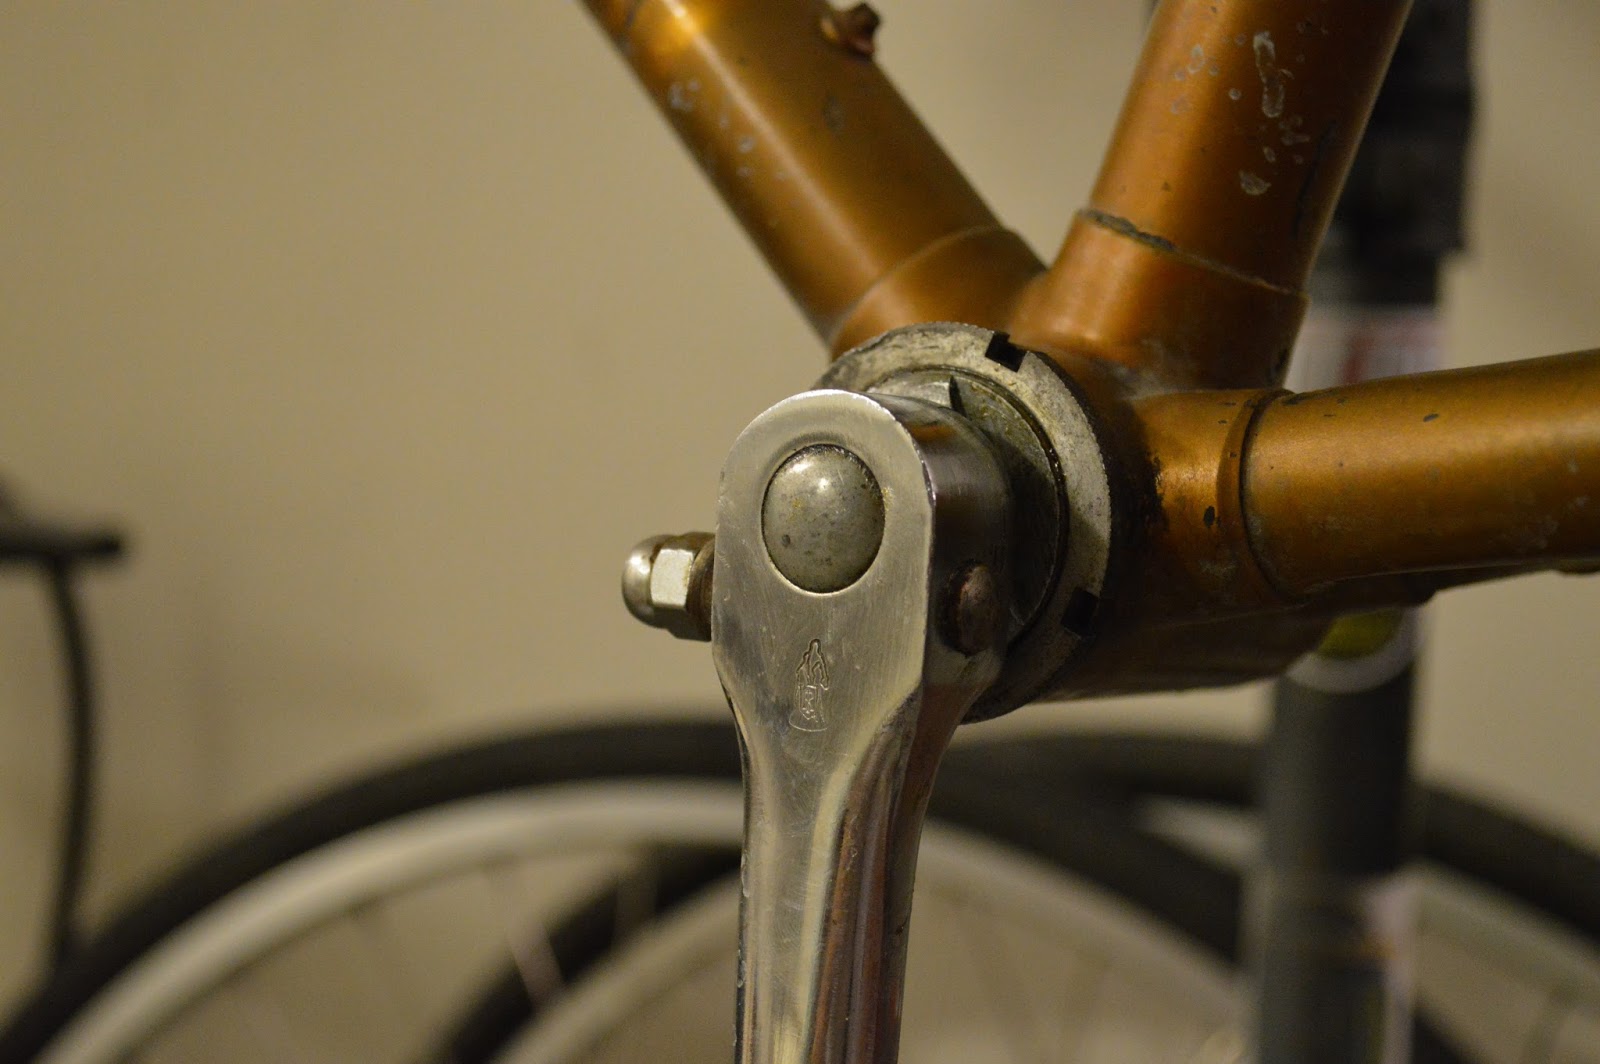
- A 55-62 mm C-spanner to unscrew the left side lock ring, and a mallet to go with it. A traditional metal hammer may cause the spanner tooth to dent the groove in the lock ring.
- A Park Tool bottom bracket spanner (the flat one). You might not reeeeally need it, but it certainly makes removal of the adjustable cup much easier.
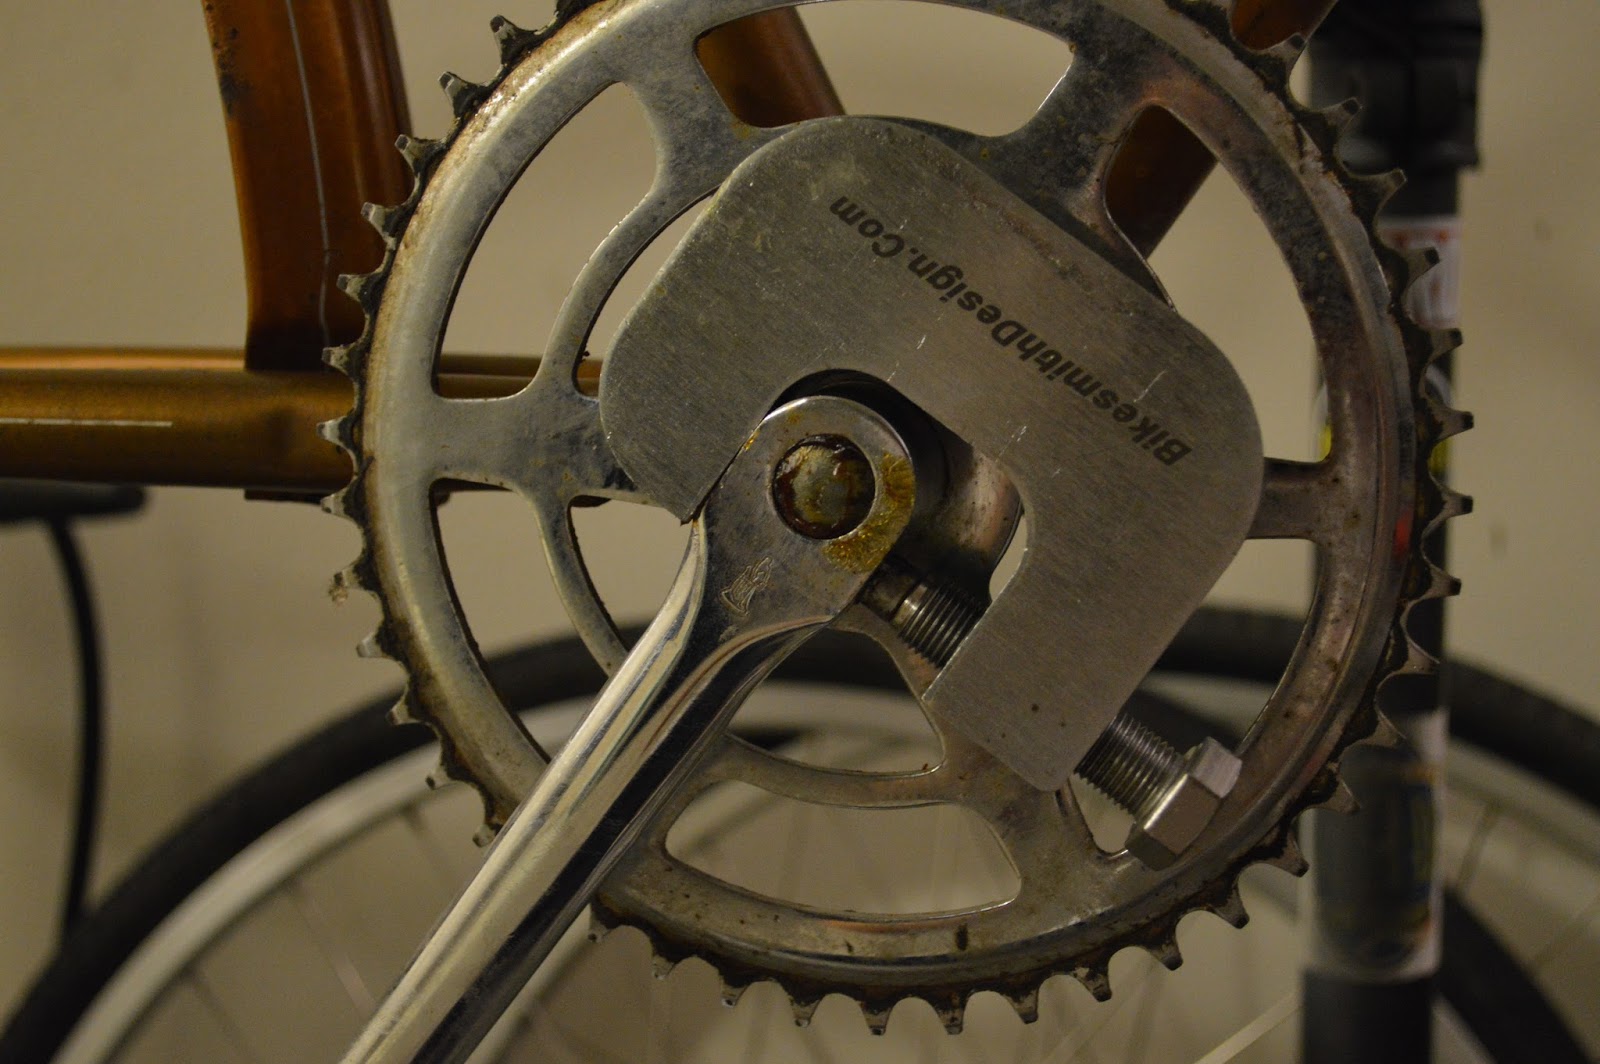
- Bikesmith Design fixed cup removal tool. This is the one with the screw and the square nut. Removal of the fixed cup is not 100% necessary for an overhaul, but I would recommend it. Details provided later on.
- Bikesmith Design cotter press. This is just a beefed up C-clamp, but the threads are finer and it fits perfectly over the crank. Occasionally you can find Park Tool or Var presses, but the Bikesmith one is by far the best thing you can buy new and in my opinion, the only one worth buying. The one pictured below is garbage. If the press is not a viable investment for you, i.e. if you only ever plan on servicing one bike, the hammer-and-pipe method outlined in Brown's article and further down here would be the way to go.
I forgot to add an adjustable wrench for the cotter press and nuts but if you want specifics, the Bikesmith press takes a 3/4" wrench, the fixed cup removal tool takes a 19mm wrench, and Raleigh cotter pin nuts fit a 7/16" wrench although newer replacement pins will often come with 10 mm nuts. But if you have an 8" or greater adjustable wrench, it should be fine.

I can't find the original source, but I once read an article by somebody with an extraordinary amount of patience saying how they would slowly trickle motor oil into the hole every few hours or so, and over the course of days, the pin would loosen up and the press would fall to the ground. notifying the mechanic. This method can be used if you have time and want to maximize the likelihood of re-using the cotter pin but since good 9.5 mm pins can be had for $3 (and lesser ones are even cheaper), it's hard not to want to speed the process at the expense of the pin, especially if you're an instant-gratification-addicted millenial like myself. Cotter pins are like chains and brake pads; there's no use trying to keep the original if you're going to ride the bike. One exception is if you want to keep the pretty R-nut cotters that came on certain Raleighs; the original Raleigh cotter pins have a different threading than new ones, even if the new ones technically fit on the bike.
EDIT: R-nut cotter pins can be bought here! Worth it if you demand a period-correct yet thorough restoration.
I also always start with the drive side cotter because if this pin proves way too difficult to remove, it is possible to only remove the right crank and slide the whole assembly out of the left side without removing the left crank. This method is obviously not as thorough, but desperate times call for desperate measures.


After waiting a day and adding more oil, the cotter pin on this bike still did not budge so I moved onto Sheldon Brown's second method: bracing the crank with something hard and smashing out the pin. Something like a pipe that is long enough to go from the crank to the floor is an option. It is important here that the weight of the bike be resting on the pipe, cement, anvil, or whatever you're hammering against via the crank arm because if the force isn't transferred straight from the crank arm to the ground, you will damage the bearings. You will need to hammer hard; smashing is not an exaggeration. Brown elaborates further on his page. In addition, to help prevent the cranks from being scratched by whatever they're resting on, cover the contacting surfaces with masking tape.

As you can see, that still did not work for me no matter how hard I hammered, likely because the floor surface I was hammering against was not solid like concrete. The threaded part of the pin had broken and I figured my neighbors were getting irritated at this point so I drilled the whole pin out. I had to start with a small bit to make sure I wouldn't hit the crank axle and destroy my bit, and then go in with progressively larger bits. After a couple hours, lots of Tap Magic, and some more smashing with a hammer and punch, the pin finally came out.


Both the lock ring and left side bearing cup are normal right hand threads. Hook the C-spanner into the lock ring and tap it loose with the mallet. You may be able to remove the adjustable cup without the Park Tool spanner but it saves your nails if you just use the tool.
On this bike, my lazy bum decided to pass on removing the left side cotter pin because I was building the bike for myself and didn't really care. Bad example! I will probably go back and redo the left side later.


With everything out and the balls soaking in a cup of acetone (all 22 of them; make sure you count), we move on to the fixed cup on the right side. Bikesmith gives directions with all of his tools.


As with any bottom bracket, swish the balls around in acetone or any other solvent of choice and clean the cups. Inspect them for any pitting; if the cups are pitted, you may want to find different ones. With Raleigh products, you will need to find Raleigh cups with the proprietary 26 threads per inch. A more modern option is to bring the bike to someone who can re-thread the bottom bracket to 24 tpi and install a sealed bearing cartridge. Choose a lightweight modern crankset of your liking and hang the original on the wall or something. However, this should probably be reserved for the worst of situations since these old cups, bearings, and chainrings are of extremely high quality and can last a very long time.


After that, grease the threads on the fixed cup and install it the same way it was removed. Fill the cup with grease. Unfortunately, this cannot be done until the cup is installed because the tool needs to fit inside where the grease would be.


If you've chosen to leave the left crank attached to the axle, take extra extra care making sure that all of the dirt and old grease has been washed out. Then, pack the whole thing with grease. If the left crank has been removed, just fill the cup with grease and stick the balls into it. Again, 11 per side. For the right side of the bottom bracket axle, just put some grease on the race and stick the balls to it.

Thoughts regarding whether or not to remove the fixed cup: If the cup is left in the bike, not only will it be slightly harder to clean, but when you're done, there will be a pool of non-evaporated acetone left in the bottom bracket. In the past, when I have gone to insert the bottom bracket axle with all the balls stuck to the right side, the acetone caused the grease to soften and drop some of the balls into the bottom bracket. Just make sure there isn't any solvent left in there. More importantly, let's say that you cover a lot of miles on this bike. Raleigh's bottom bracket bearings, cups, and spindles are of very high quality and are difficult to kill. However, lots of mileage, water intrusion, and dirt can cause pitting of the pieces, leading to replacement. Having grown up in the rainy and salty Midwestern/eastern U.S, I am no stranger to rusty and seized parts and I like to make sure all threads have grease, blue Loctite, or some other form of anti-seize before reassembly in case anything needs to be replaced later on.
Moving on: holding the axle in place, slide the left cup on, thread it in right until there is no play; no tighter, no looser. Turn the lock ring into place and give it the C-spanner a few taps with the mallet. Wiggle the axle around and turn it, making sure there is still no play and no binding. This may take a couple tries.

If the cotter pins still have good threads and good flats, go ahead and re-use them as the old pins are generally better-made. Generally, the flats on re-used pins need to be filed just to make sure you're starting out with a fresh surface. New pins may need to be filed as well if they don't go in far enough. Brown elaborates further on this process if you find it necessary. Don't forget to grease the pins so that any subsequent service the bottom bracket will need goes smoothly.
Whichever way you install the first cotter pin, remember to do it the same way on both sides, i.e. if the nut is facing up when the crank is facing forward on that side, or vice versa. Since the flats on the cotter pins come at an angle, flipping one pin will result in the crank arms not being 180 degrees apart.

After wiggling the pin in with your fingers and making sure it's properly positioned, use the cotter press and push it home. Do not use the nut on the pin to tighten the pin; the metal is soft and will just strip away before the pin gets remotely tight enough. With the fine threads of the Bikesmith press, you generally don't need a huge amount of leverage to get the job done; the standard 3/4" wrench that comes in a set should be long enough. How far the pin goes in will depend on how much of it was filed off.

When complete, the crank should be able to spin freely without any wiggling.
Pretty nice description, but I do take issue with your reasons for removing the fixed cup. I just finish the cleaning of the bottom bracket shell with pressurized air or compressed air. I don't have a compressor, so I use canned air, just to make sure that I have removed any remaining grit or cleaning fluid. The fixed cup really should only be removed if you plan to replace it. Using a flashlight to inspect the race of the fixed cup works pretty well. The visual inspection of the bearing you removed also says a lot about the condition of the fixed cup.
ReplyDeleteI see what you're saying. I don't disagree; I usually remove it just because I can, but it certainly is not a necessity most of the time. I just figured I'd outline it in case it does need to removed. I also like to make sure the threads are greased so that down the road, if the cup does need to be replaced, it's not seized. I wrote this 4 years ago - I should probably edit it to convey my thoughts more accurately.
Delete